You must be signed in to read the rest of this article.
Registration on CDEWorld is free. You may also login to CDEWorld with your DentalAegis.com account.
When dental implants were originally developed, they were intended for multi-unit restorations, not as single-tooth replacement. Multi-unit restorations were called hybrid, or high-water dentures, because the prosthesis was anchored to implants above the gingiva (Figure 1). The initial implant designs did not have adequate anti-rotation features, so implants were not used for single-tooth replacement until years after they were first developed and further investigation was made.
Earlier techniques for restoring single-tooth implants were to fabricate an abutment separately from the implant and then join them together with a screw, followed by cementation of the crown to the abutment. This technique, which was similar to cementing a crown to a natural tooth, did not have a visible screw access hole on the occlusal surface. However, complications arose when the screw holding the abutment loosened under the crown. Removing a non-retrievable crown became a problem. Restorations with accessible screw access holes on the occlusal surfaces were developed to address this problem. Both methods of retention, screw-retained and cement-retained implant crowns, have advantages and disadvantages that will be discussed.
Single-Unit Screw-Retained Implant-Supported Crowns: Advantages and Disadvantages
The advantages of screw-retained implant-supported crowns include retrievability, retention, and better control of hygiene. Retrievability means the crown is recoverable without inflicting damage to the restoration.1 The crown can also easily be tightened in the case of screw loosening or removed in cases of chipping or fractures for repair. Screw-retained crowns can compensate for a short abutment height to counter tipping forces that can cause dislodgment. This is especially beneficial in cases that lack the interocclusal space. Hygiene control is another important advantage because the crown can be removed by the clinician for any soft-tissue issues. Additionally, because no cementing process is involved, there is no risk of cement-induced peri-implantitis.2
However, there are disadvantages associated with the screw-retained technique. First, the location of the screw access hole is critical, especially in the anterior region. If the screw access channel, which must follow the angulation of the implant fixture, is positioned either on the incisal edge of the crown or even on the labial surface of the restoration, it could present an esthetic problem. In the posterior region, if the patient has a limited amount of opening, positioning the screw-driver can be challenging.3 New angulated screw channel systems have been developed to combat these issues, which will be discussed. However, porcelain fractures are more likely to occur with the screw-retained technique because the presence of the access hole interrupts the continuity of the ceramic and can lessen the strength. Lastly, the laboratory costs are generally higher because of the increased labor to fabricate this type of restoration.
Single-Unit Cement-Retained Implant-Supported Crowns: Advantages and Disadvantages
Cement-retained implant-supported crowns are similar to crowns cemented to natural teeth. In fact, general prosthodontic principles are applicable whether the crown is cemented to an implant abutment or a natural tooth. For instance, the height of an abutment and/or a prepared natural tooth is an important factor for retention, which generally is considered at a minimum of 5 mm.4At the same time, the amount of occlusal clearance is also critical for support of the restorative material. Because this type of crown is fabricated in a similar fashion in the laboratory as a natural tooth crown, a number of laboratory techniques can be employed in lesser ideal circumstances. For example, if the angulation needs to be corrected for a better path of insertion, the laboratory technician can employ techniques to allow a passive fit of the restoration. Although there is no screw access opening to contend with, esthetic concerns in the anterior region are usually not present. Additionally, the cement-retained crown allows a more continuous ceramic volume without interruption of a screw access channel. Having an intact ceramic structure can possibly add to the strength of the porcelain. Finally, laboratory costs for cement-retained implant restorations have fewer variables and can be lower.
As far as disadvantages, the most concerning would be the lack of predictable retrievability. The underlying abutment screw can loosen, so it is imperative that the crown can be removed to gain access to the screw without causing damage. A number of different cements have been developed for these particular purposes with different retentive values. Depending on the type of cement used, retention of the crown and retrievability of the crown are not always reliable. Some cements may be too retentive, not allowing retrievability, or may not be retentive enough, causing the patient repetitive appointments for re-cementation. Nevertheless, in all cases that involve the use of cement for retention, it is critical that every bit of excess cement is removed. There is a correlation with excess cement remaining around the abutment and peri-implantitis.5
Fabrication Techniques for Cement-Retained Crowns
Cement-retained implant crowns are usually constructed starting with some type of impression technique, unless the clinician employs an in-office chairside milling technique or an out-of-office scanning technique. The impression techniques are either a closed-tray or an open-tray method. The closed-tray method can be further divided into an impression of the secured abutment or by using a transfer impression coping where the abutment is either custom-made or fitted by a stock abutment. In the former method, the abutment can either remain with the patient or be removed and inserted into the impression before sending it to the lab. There are concerns using this abutment transferring method because chance for errors increases when the coping is removed and replaced.6 In the open-tray method, transfer impression coping is secured to the implants with longer screws that project through an opening that has been made in the impression tray. After the impression material sets, the transfer coping screws are loosened, allowing separation of the impression tray from the mouth with the transfer coping embedded in the impression. This open-tray method has been shown to be more accurate.7For screw-retained crowns, the same impression techniques can be applied.
Occlusal Trauma and Overload
Occlusion is thought by many authors to be a key factor in the success of dental implants. Natural teeth are anchored to the bone by the periodontal ligament, which acts as a shock-absorber against occlusal forces. Dental implants, in contrast, come in direct contact with the bone.8 With implants, because the periodontal ligament is not a factor, the direct transmission of occlusal forces often has an adverse effect on the implant and peri-implant bone.9 Occlusal overloading can also lead to mechanical complications of the implant, such as loosening of the screw or fracture, abutment or prosthesis fracture, or implant fracture. However, the relationship between occlusal trauma and peri-implant bone loss remains controversial.10 According to a literature review conducted by Duyck and Vandamme, a commonality in studies was the lack of a quantitative number describing excessive occlusal forces of a normal load.11 It has been suggested that overload can be considered as the amount of force that supersedes the adaptability potential of the host, but it has been shown that occlusal overload is difficult to quantify.12Therefore, it is difficult to ascertain what the threshold of force should be when determining the least traumatizing restorative material on the implant fixture.
Restorative Materials for Implant-Supported Single Crowns
When choosing a restorative material for a single-unit implant crown, it is important to not only consider functional and esthetic requirements but also the workability of the material. As previously mentioned, the effect of occlusal load on implant fixtures is still controversial. In a study conducted to measure stress dissipation on the implant/abutment/crown assembly by crowns made of zirconia, all-ceramic, metal, composite, and acrylic, it was concluded that the crown material with the lowest elastic modulus dampened the occlusal impact force the most, whereas zirconia exhibited the highest stress value.13 Because the occlusal load effect has not been settled, a material with lower modulus may be used for implant-supported restorations provided the esthetic need is met.
A material that is composed of polymer-infiltrated ceramic framework (PICN) with a low elastic modulus (30 GPa, more closely resembling dentin than ceramic14) and fulfills esthetic requirements can be used. This is a millable material that consists of a ceramic framework with an infiltrated monomer that is polymerized under heat and pressure. The internal 3-dimensional skeleton distributes occlusal stress, resulting in a resistance of crack propagation. The advantage to using a PICN material is the ability to add composite material post-milling. Whether the interproximal contact area needs to have an addition or altering the undersurface of the crown, this restorative material provides that opportunity. In most practices, any additions needed for a zirconia restoration cannot be made chairside and must be returned to the laboratory.
Screw/Cement-Retained Implant-Supported Hybrid Crown Technique
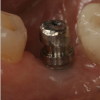
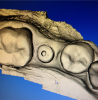
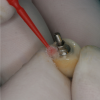
The following technique is for converting a cement-retained implant crown to a screw-retained implant crown using chairside milling technology. In this case, a stock abutment or even the stainless-steel carrier may be used as a modified abutment (Figure 1). First, the abutment must be adjusted for occlusal, mesiodistal, and buccolingual clearance. Then circumferential undercuts are placed with a diamond disc. An anodizing unit may be used to apply a thin gold-colored film to mask the grey color. This unit generates a specific voltage of direct current (VDC). When the metal abutment is placed into an acidic electrolyte solution, trisodium phosphate (TSP), electrons are deposited onto the titanium surface. Next, the abutment must be secured to the implant fixture. The screw access hole is left open. The abutment is scanned along with the opposing arch and bite registration (Figure 2). The crown is then designed and milled.15
After the fit is verified, the screw access hole is placed through the occlusal surface. This is completed by first locating the nipple on the intaglio surface that is present from the milling process (abutment screw access hole left open during the scan). Approaching from the undersurface with a 016 round-ended tapered diamond bur, a hole is placed up through the occlusal surface. The crown is then placed back on the abutment to verify the correct location. After it is verified, the opening is increased to the diameter of the abutment screw. In preparing for cementation, Teflon tape is placed in the screw access hole on the abutment. The internal surface of the crown is then etched with 5% hydrofluoric acid for 1 minute. This will dissolve the ceramic phase of the material, creating a honeycomb-like structure formed by the remaining resin network. The etch pattern results in a high micromechanical interlocking potential for the addition of resin composite.16
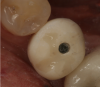
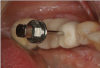
After the restoration is rinsed and dried, the bonding surfaces are conditioned with a ceramic primer containing methacryloyloxydecyl dihydrogen phosphate (MDP). A dual-cure resin cement is then used to bond the crown to the abutment. Before using the curing light, the cement must be cleared from the inside of the screw channel (Figure 3). After the initial set of the cement, the screw is removed along with the crown (Figure 4). At this point, the tissue surface side of the crown can be modified and smoothed. If there are any voids, the surface can be cleaned, etched followed by an application of an adhesive, and then light-cured. A composite material can be applied, light-cured, and polished.
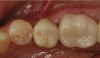
Next, the clinician can use a staining kit to colorize the crown. To do so, the surface is etched with 5% hydrofluoric acid for 1 minute and rinsed and dried. Then cleaner is applied, followed by ceramic primer and stains. The crown is then light-cured. Glaze is applied with a micro-brush and light-cured (Figure 5). The crown is then inserted and the screw is torqued to the manufacturer's instructions. Teflon tape is placed in the screw channel followed by a composite plug (Figure 6). The result is a cement-retained crown that has been converted to a screw-retained crown, with no additional laboratory costs.
Treating a Malpositioned Implant
When the angulation of the screw access channel is in an undesirable position, methods can be employed to offset the unesthetic result. The method used is based on the amount of correction needed. Premachined angled abutments or custom abutments with a milled lingual screw hole can be used.17 An alternative method is to use an angulated screw channel technique. This technology is based on the round-ended Allen wrench tool that allows engagement of the screw head from an angled pathway. The angulated screw access channel allows the prosthetic screw channel to be angled off the implant/abutment axis up to 25° to 30° depending on the manufacturer. This system can also be used in the posterior region where there may be a lack of vertical access.
Replacing Lost Gingival Tissue in Anterior Region
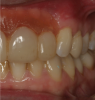
In restorative cases where a significant loss of gingival tissue has occurred due to trauma or disease, it can be difficult to satisfy the esthetic needs of the patient. Artificial gingival tissue can be created with acrylic, gingival-shaded porcelains, or composites. The objective is to reproduce the color, contour, and texture of the patient's adjacent tissue. A provisional restoration is used to determine the merging between natural and artificial gingival tissue and determine whether there is a need for a "floating papilla," which is an artificial papilla that overlaps an adjacent natural tooth (Figure 7).18
One of the reasons for using a gingival-shade resin composite to create the missing gingival tissue is that it can be done chairside and allows the clinician to accurately match the color, texture, and contour of the tissue. The results are predictable and do not require ceramic baking. The technique of applying gingival-shaded resin composite starts at the initial design of the prosthesis. The laboratory must provide areas in the framework where the composite can easily be bonded. If a zirconia framework is used, then a light wash of porcelain can be applied. This allows for bonding of the resin adhesive to the framework. Before placing the restoration, the areas where the artificial gingiva will be placed need be etched with hydrofluoric acid. After the prosthesis is in place, the porcelain can be primed with a silane coupler, followed by the application of the bonding adhesive. After light-curing the adhesive, different gingival shades of resin composite are applied and sculpted to blend into the adjacent tissue architecture. Matching the gingival color is easily obtained in this manner as opposed to the laboratory technician trying to match from a photograph. After all the resin composite is placed and final contours are finished, a glaze can be applied to the artificial gingiva surface. If any changes or additions are necessary in the future, they can easily be accomplished chairside without any laboratory involvement.
Impression Trays
Custom trays improve the accuracy of elastomeric impressions. They also limit the volume of impression material, thereby reducing the amount of polymerization contraction stress as well as decreasing the stresses applied during tray removal. Autopolymerizing polymethyl methacrylate resins become stable after 24 hours of fabrication and are sufficiently rigid at 2.5 to 3 mm of uniform thickness. Visible light-cure urethane polymethacrylate resins are stable enough immediately after being light-cured and require the same minimum thickness for rigidity.19,20 The main disadvantage is the time needed for fabrication. They must be completed 24 hours in advance to minimize the distortion of autopolymerized resin. If autopolymerized resin is being used, the impression should be poured immediately to prevent further distortion of the tray.
Stock impression trays should not deform during insertion to and removal from the mouth. Additionally, metal trays are more rigid than plastic trays, and plastic trays differ in rigidity. Both perforated and nonperforated metal trays produce accurate impressions due to their ability to resist deformation during the impression procedure. Tray adhesives are required for both types. High-viscosity impression materials have poor flow, which can result in pressure building during seating. This, in turn, can distort a plastic tray. Metal trays, however, show the least amount of cross-arch change.21
Conclusion
Advances in restorative techniques and materials have provided clinicians with more options in restoring the single implant-supported crown. Difficult case scenarios, whether they are unsuitable screw access locations or severe tissue lost in the anterior region, can be treated with precision and predictability with new restorative materials and techniques.
About the Author
Gregg Helvey, DDS, CDT
Private Practice
Middleburg, Virginia
References
1.Choosing between screw-retained and cement-retained implant crowns. Glidewell Dental. http://glidewelldental.com/education/inclusive-dental-implant-magazine/volume-2-issue-2/choosing-between-screw-retained-and-cement-retained-implant-crowns/. Accessed March 6, 2018.
2. Understanding screw-retained implant restorations. Spear Education. http://www.speareducation.com/spear-review/2014/01/understanding-screw-retained-implant-restorations. Published January 31, 2014. Accessed March 6, 2018.
3. Schoenbaum TR, Wadhwani CPK. Screw-retained versus cement-retained restorations: aesthetic zone options. Dent Today. 2017;36(1):100-107.
4. Assaf M, Gharbyeh AA. Screw-retained crown restorations of single implants: a step-by-step clinical guide. Eur J Dent. 2014;8(4):563-570.
5. Korsch M, Obst U, Walther W. Cement-associated peri-implantitis: a retrospective clinical observational study of fixed implant-supported restorations using a methacrylate cement. Clin Oral Implants Research. 2014;25(7):797-802.
6. Taylor TD, Agar JR, Vogiatzi T. Implant prosthodontics: current perspective and future directions. Int J Oral Maxillofac Implants. 2000;15(1):66-75.
7. Papaspyridakos P, Chen C-J, Gallucci GO, et al. Accuracy of implant impressions for partially and completely edentulous patients: a systematic review. Int J Oral Maxillofac Implants. 2014;29(4):836-845.
8. Yuan JC-C, Sukotjo C. Occlusion for implant-supported fixed dental prostheses in partially edentulous patients: a literature review and current concepts. J Periodontal Implant Sci. 2013;43(2):51-57.
9. Tawil G. Peri-implant bone loss caused by occlusal overload: repair of the peri-implant defect following correction of the traumatic occlusion. A case report. Int J Oral Maxillofac Implants. 2008;23(1):153-157.
10. Junqueira RB, Saavedra GdeSFA, deMacedo NL. Considerations about the relation between occlusal trauma and periodontal/peri-implant disease. Brazil Dent Sci. 2015;18(2):9-14.
11. Duyck J, Vandamme K. The effect of loading on peri-implant bone: a critical review of the literature. J Oral Rehabil. 2014;41(10):783-794.
12. Menini M, Conserva E, Tealdo T, et al. Shock absorption capacity of restorative materials for dental implant prostheses: an in vitro study. Int J Prosthodont. 2013;26(6):549-556.
13. Bijjargi S, Chowdhary R. Stress dissipation in the bone through various crown materials of dental implant restoration: a 2-D finite element analysis. J Invest Clin Dent. 2013;4(3):172-177.
14. Coldea A, Swain MV, Thiel N. Mechanical properties of polymer-infiltrated-ceramic-network materials. Dent Mater. 2013;29(4):419-426.
15. Helvey GA. A simple technique for fabricating a screw-retained/cemented implant-supported crown. Compend Contin Educ Dent. 2017;38(3):153-159.
16. Mainjot AK, Dupont NM, Oudkerk JC, et al. From artisanal to CAD-CAM blocks: state of the art indirect composites. J Dent Res. 2016;95(5):487-495.
17. Pigliacelli S. Correcting malpositioned dental implants: where do we go from here? Perio-Implant Advisory. http://www.perioimplantadvisory.com/articles/2016/03/correcting-malpositioned-dental-implants-where-do-we-go-from-here.html. Published March 15, 2016. Accessed March 6, 2018.
18. Coachman C, Salama M, Garber D, et al. Prosthetic gingival reconstruction in fixed partial restorations. Part 3: laboratory procedures and maintenance. Int J Periodontics Restorative Dent. 2010;30(1):19-29.
19. George S, Shenoy VK, Rodrigues SJ, et al. An in vitro study to evaluate the accuracy of dies obtained from dual-arch impression trays using addition silicone impression material and tray combinations. J Interdiscip Dent. 2015;5(3):119-124.
20. Hoyos A, Soderholm KJ. Influence of tray rigidity and impression technique on accuracy of polyvinyl siloxane impressions. Int J Prosthodont. 2011;24(1):49-54.
21. Cho GC, Chee WWL. Distortion of disposable plastic stock trays when used with putty vinyl polysiloxane impression materials. J Prosthet Dent. 2004;92(4):354-358.